What is ASP.NET Core?
ASP.NET Core is a cross platform,high performance,open source framework for building modern,cloud based, Internet connected applications. With ASP.NET Core, you can:- Build web apps and services, IoT apps, and mobile backends.
- Use your favorite development tools on Windows, macOS, and Linux.
- Deploy to the cloud or on-premises.
- Run on .NET Core or .NET Framework.
1) Download and install
- .NET Core 2.00 SDK
- Visual Studio Code C# extension
2) Restart your PC/Device to apply the changes.
3) From the command prompt (cmd) run the following commands to create the project
- mkdir Product
- cd Product
- dotnet new ProductApi
4) Open the ProductApi folder in Visual Studio Code and select the Startup.cs file.
- Select Yes to the Warn message "Required assets to build and debug are missing from 'ProductApi'. Add them?"
- Select Restore to the Info message "There are unresolved dependencies".
5) Create new controller and name it as 'ProductController'
 |
| Add new class |
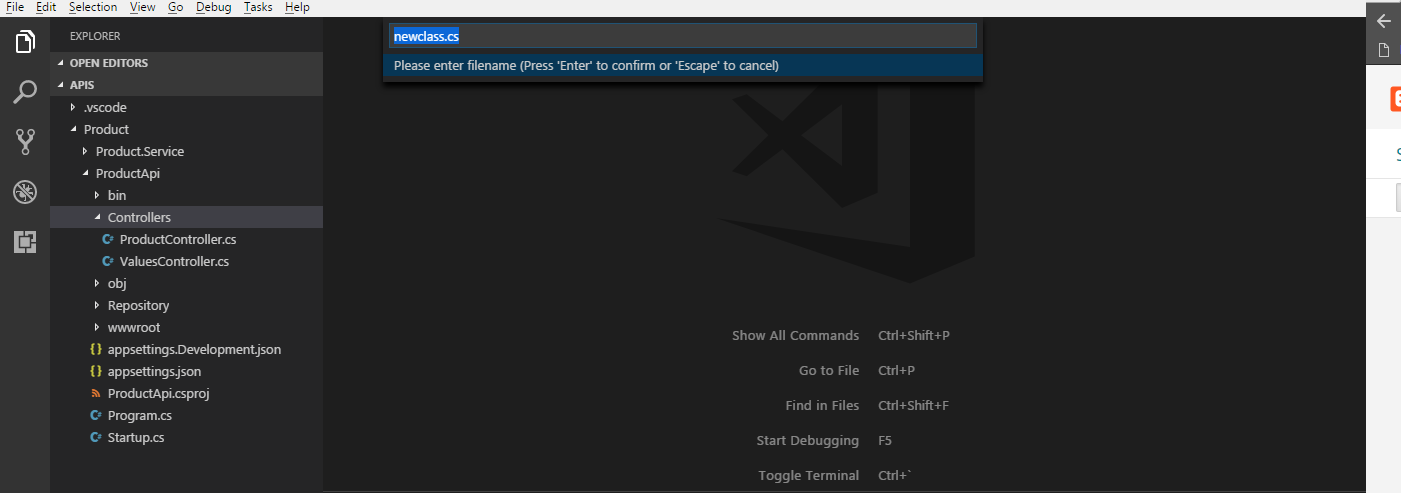 |
| Add Controller |
- cd ..
- dotnet new classlib -n Product.Service -o Product.Service
- cd Product.Service
- mkdir Data
- mkdir Logic
- mkdir Models
7) Open the Product.Service.csproj file and add the following references.
 |
| Sample csproj file |
8) From the command prompt,navigate to Models folder and create a class called Products and define properties as shown below.
public class Products
{
public int Id { get; set; }
public string GuProductId { get; set; }
public string Code { get; set; }
public string Name { get; set; }
public double UnitPrice { get; set; }
public string PaymentOption { get; set; }
public string Description { get; set; }
}
9) From the command prompt, navigate to Data folder and create a class called ProductContext and inherit DbContext class of Microsoft.EntityFrameworkCore namespace as shown below.
We have successfully created the DbContext and Model classes to interact with the database. Now We are going to implement the Repository pattern in DAL Project to interact with the database and communicate with the API project .
10) From the command prompt,navigate to the Logic folder in DAL Project and run the following commands.
using Microsoft.EntityFrameworkCore;
using Product.Service.Models;
using Product.Service.Models;
public class ProductContext : DbContext
{
public ProductContext(DbContextOptions<ProductContext> options): base(options)
{
}
public DbSet<Products> Products { get; set; }
}
We have successfully created the DbContext and Model classes to interact with the database. Now We are going to implement the Repository pattern in DAL Project to interact with the database and communicate with the API project .
10) From the command prompt,navigate to the Logic folder in DAL Project and run the following commands.
- cd ..
- cd Logic
- mkdir Repository
- cd Repository
11) Create an interface called IProductLogicAPI to define methods and then create a class called
ProductLogicAPI and inherit the interface created before to implement the methods as shown below.
using System.Collections.Generic;
using System.Threading.Tasks;
using Product.Service.Models;
public interface IProductLogicAPI
{
Task<IEnumerable<Products>> GetAll();
Task AddProducts(Products product);
Task<Products> FindProduct(string key);
}
using System.Collections.Generic;
using System.Threading.Tasks;
using Product.Service.Data;
using Product.Service.Logic.Repository;
using Product.Service.Models;
using System.Linq;
using Microsoft.EntityFrameworkCore;
public class ProductLogicAPI : IProductLogicAPI
{
ProductContext _context;
public ProductLogicAPI(ProductContext context)
{
_context = context;
}
public async Task<IEnumerable<Products>> GetAll()
{
return await _context.Products.ToListAsync();
}
public async Task AddProducts(Products product)
{
await _context.Products.AddAsync(product);
await _context.SaveChangesAsync();
}
public async Task<Products> FindProduct>(string key)
{
return await _context.Products
.Where(e => e.GuProductId.Equals(key))
.SingleOrDefaultAsync();
}
}
12) Open the ProductApi.csproj file and add the following reference to it.
<ItemGroup>
<PackageReference Include="Microsoft.AspNetCore.All" Version="2.0.5" />
<PackageReference Include="Microsoft.EntityFrameworkCore.SqlServer" Version="2.0.1" />
<PackageReference Include="Microsoft.EntityFrameworkCore.Tools" Version="2.0.1" />
<PackageReference Include="Microsoft.EntityFrameworkCore.Design" Version="2.0.1" />
</ItemGroup>
<ItemGroup>
<DotNetCliToolReference Include="Microsoft.VisualStudio.Web.CodeGeneration.Tools" Version="2.0.2" />
<DotNetCliToolReference Include="Microsoft.En
tityFrameworkCore.Tools.DotNet"
Version="2.0.0"/>
</ItemGroup>
<ItemGroup>
<ProjectReference Include="..\Product.Service\Product.Service.csproj" />
</ItemGroup>
13) Open the ProductController and add the code shown below.
[Route("api/[Controller]")]
public class ProductController : Controller { public IProductLogicAPI ProductRepo { get; set; } public ProductController(IProductLogicAPI _repo) { ProductRepo = _repo; } // GET api/values [HttpGet] public async Task<IActionResult> GetAll() { var productList=await ProductRepo.GetAll(); return Ok(productList); } [HttpGet("{id}", Name = "GetProduct")] public async Task<IActionResult> GetById(string id) { var item = await ProductRepo.FindProduct(id); if (item == null) { return NotFound(); } return Ok(item); } [HttpPost] public async Task<IActionResult> AddProduct([FromBody] Products product) { if (product == null) { return BadRequest(); } await ProductRepo.AddProducts(product);
return CreatedAtRoute("GetProduct", new { Controller = "Product",
public class ProductController : Controller { public IProductLogicAPI ProductRepo { get; set; } public ProductController(IProductLogicAPI _repo) { ProductRepo = _repo; } // GET api/values [HttpGet] public async Task<IActionResult> GetAll() { var productList=await ProductRepo.GetAll(); return Ok(productList); } [HttpGet("{id}", Name = "GetProduct")] public async Task<IActionResult> GetById(string id) { var item = await ProductRepo.FindProduct(id); if (item == null) { return NotFound(); } return Ok(item); } [HttpPost] public async Task<IActionResult> AddProduct([FromBody] Products product) { if (product == null) { return BadRequest(); } await ProductRepo.AddProducts(product);
return CreatedAtRoute("GetProduct", new { Controller = "Product",
id = product.GuProductId }, product);
}
}
14) Open the startup.cs file and add the following commands.
services.AddDbContext<ProductContext>(options =>
options.UseSqlServer(Configuration.GetConnectionString("DefaultConnection")));
//using Dependency Injection
services.AddScoped<IProductLogicAPI, ProductLogicAPI>();
15) Open the appsettings.json and add the connection string as shown below.
{
"Logging": {
"IncludeScopes": false,
"Debug": {
"LogLevel": {
"Default": "Warning"
}
},
"Console": {
"LogLevel": {
"Default": "Warning"
}
}
},
"ConnectionStrings": {
"DefaultConnection": "Data Source=SERVER-LAP;Initial Catalog=NComDB;
Integrated Security=True;MultipleActiveResultSets=True"
}
}
16) From the command prompt, navigate to Product.Service (DAL) project and then run the following commands to migrate model to database.
dotnet ef --startup-project ../ProductApi migrations add init
Note - add init migrations command will create c# class for model snapshot.
After this run the following command to create the database in SQL Server.
dotnet ef --startup-project ../ProductApi database update
Now we have come to the end where now we can run the project and insert data to SQL Server database using Entity Framework. I hope this article is helpful for beginners.


