Monday, 28 May 2018

Integrating SonarQube with Jenkins for PHP


SonarQube is a quality management tool popularly used among 85000 companies around the world. It has four editions.
  • Community Edition ( free & open source )
  • Developer Edition
  • Enterprise Edition
  • Data Center Edition

Note: Community Edition is more than enough for company perspective.


For more details Continuous Code Quality| SonarQube

Let's see how we can integrate SonarQube with Jenkins for PHP.

I assume that already CI/CD for projects with Jenkins and GitHub has been configured. If you want to CI/CD with Jenkins, follow Continuous Integration with Jenkins and GitHub to automate the deployment article.

Prerequisites

  • Ubuntu 16.04 server instance with at least 2GB RAM.
  • A sudo user
  • Jenkins server with reverse proxy enabled using Apache

Step 1: Perform a system update

sudo apt-get update
sudo apt-get -y upgrade
Note: Make sure java is already installed. If not follow the below steps to install java.
sudo apt-get install openjdk-7-jdk
java -version

Step 2: Download and configure SonarQube

wget https://sonarsource.bintray.com/Distribution/sonarqube/sonarqube-6.7.3.zip
For more versions you can check the link in SonarQube download page.
  • Install unzip by running below code.
sudo apt-get -y install unzip
  • Unzip the archive by using below command.
sudo unzip sonarqube-6.7.3.zip -d /opt
  • Rename the directory
sudo mv /opt/sonarqube-6.7.3 /opt/sonarqube
  • Open the SonarQube configuration file.
vi /opt/sonarqube/conf/sonar.properties
  • Find and uncomment the following line with the username,password and url of the SQL Azure and save the file.
sonar.jdbc.username=test
sonar.jdbc.password=test@123
sonar.jdbc.url=sqlserver://localhost;databaseName=_sonar
Note : If you don't change above lines,by default SonarQube will take embedded database for evaluation purpose. SonarQube will not start with root user from SonarQube 6.7, therefore we have to do necessary changes to up the sonarQube server. Give permission to your server user, for example in my case I have a user called qauser and I need to give below permission to support the startup.
chown -R qauser:qauser /opt/sonarqube
  • Now go to below path.
vi /opt/sonarqube/bin/linux-x86-64/sonar.sh
  • Find the below line and change it as shown
RUN_AS_USER=qauser

Step 3:Configure Systemd service 

  • SonarQube can be started directly using the startup script provided in the installer package. As matter of convenience, you should setup a Systemd unit file for SonarQube. In order to achieve it follow the below.
vi /etc/systemd/system/sonar.service
  • Now populate the file with below code.
[Unit]
Description=SonarQube service
After=syslog.target network.target

[Service]
Type=forking

ExecStart=/opt/sonarqube/bin/linux-x86-64/sonar.sh start
ExecStop=/opt/sonarqube/bin/linux-x86-64/sonar.sh stop

User=qauser
Group=qauser
Restart=always

[Install]
WantedBy=multi-user.target
  • Start the server by running as shown below.
sudo systemctl start sonar
  • Enable the SonarQube service automatically start at boot time.
sudo systemctl enable sonar
  • To check if the service is running
sudo systemctl status sonar

Step 4: Configure reverse proxy

  • By default SonarQube listens to localhost port 9000. We will use Apache to reverse proxy the application.
  •  First, open to the below file
vi /opt/sonarqube/conf/sonar.properties
  • Uncomment and change the below code accordingly.
 sonar.web.context=/sonarqube
  • Open the file below
 vi /etc/apache2/site-available/default-ssl.conf
  • Finally add the below line and restart the Apache server.
 
ProxyPass         /sonarqube  http://localhost:9000/sonarqube nocanon
ProxyPassReverse  /sonarqube  http://localhost:9000/sonarqube


     Order deny,allow
     Allow from all


  • SonarQube is up and running on your server,access the dashboard at following address
http(s)://yourdomain.com/sonarqube
  • Log in using the initial administrator account (username,password- admin) and start analyzing the code.

Step 5: Configure SonarQube with Jenkins

  • Log in to Jenkins portal,go to Manage Jenkins tab.
  • Then select Manage Plugins and install SonarQube Scanner for Jenkins.
  • Go to Configure System in Manage Jenkins tab and configure the SonarQube server installed as shown below.


  • Now go to Configure Global Security and do the below changes under CSRF Protection.


  • Then go to Global Tool Configuration and add SonarQube Scanner as shown below.


  • Go to project configuration and under Build Environment tick 'Prepare SonarQube Scanner environment' checkbox.
  • Then click Add build step and select 'Execute SonarQube Scanner' and following lines.

sonar.projectKey=projectKey
sonar.projectName=projectName
sonar.projectVersion=${BUILD_NUMBER} (optional)
sonar.sources=.


  • Finally log in to SonarQube with administrator privilege,under 'Administration' select 'Marketplace' sub tab and search for SonarPHP (plugin for PHP) as shown below.


  • That's all, now restart the SonarQube server after SonarPHP installation and continue to analyze your code.


 Is there anything you need to clarify about SonarQube? Let me know in the comment below.

Tuesday, 15 May 2018

Continuous Integration with Jenkins and GitHub to automate the deployment


Continuous Integration (CI) is rapidly becoming an integral part of software development process as it makes our monotonous and repetitive tasks a little and execute it with ease. CI is a project development practice where developers integrate code into a repository frequently. Each Integration is then verified by an automated build that allows the team to detect problems in an early stage. 

Let me walk through continuous integration with Jenkins and GitHub. Here we will install Jenkins, create Jenkins tasks and then configure it to GitHub. When creating Jenkins tasks I'm going to use PHPUnit tests in build steps to detect problems.


Why Jenkins is so popular in Continuous Integration?

Jenkins is an open-source tool that tests and compiles the code. If everything is fine then it deploys the code for production else you will get a notification that builds has failed and you need to fix the error.

Advantages of Jenkins

  • Easily configurable
  • Platform independent
  • Rich plugin support
  • Easy to create new Jenkins plugin if one is not available
Now let's follow the below steps to configure integration with Jenkins and GitHub.

Step 1 : Add the key and source list to apt for Jenkins.

$ wget -q -O - https://pkg.jenkins.io/debian/jenkins-ci.org.key | sudo apt-key add -
When the key is added, the system will return OK.

Step 2 : Append the Debian package repository address to the server's sources.list
$ echo deb https://pkg.jenkins.io/debian-stable binary/ | sudo tee /etc/apt/sources.list.d/jenkins.list
Step 3 : Update the packages

$ sudo apt-get update
Step 4 : Now install Jenkins
$ sudo apt-get install jenkins
Step 5 : Start Jenkins using systemctl.
$ sudo systemctl start jenkins
Step 6: Since above command does not provide an output, we should run status command to check the status of the Jenkins server
$ sudo systemctl status jenkins
If everything goes well the output of the above command shows the service as active.
jenkins.service - LSB: Start Jenkins at boot time
  Loaded: loaded (/etc/init.d/jenkins; bad; vendor preset: enabled)
  Active:active (exited) since Thu 2017-04-20 16:51:13 UTC; 2min 7s ago
    Docs: man:systemd-sysv-generator(8)

Step 7:  By default, Jenkins use 8080 port. Change the port to custom and allow it outside to access it from the browser.
$ vi /etc/default/jenkins
Replace the HTTP_PORT with custom.
HTTP_PORT=7011
Restart the Jenkins service
$ sudo service jenkins restart

Step 8: Setting up Jenkins
To setup Jenkins we need to visit Jenkins using the custom port as shown below.
http://ip_address_or_domain_name:7011

We should see "Unlock Jenkins" screen which displays the location of the initial password.

Go to below path and copy the 32 bit character string and paste it and continue.
sudo cat /var/lib/jenkins/secrets/initialAdminPassword /

Next screen shows the options of install suggested plugins or select specific plugins. Select the instal suggested plugin option in our case.


Once the installation finish,we will be prompted to create our first administrative user as shown below.


Once we save and finish we are done with the setup of Jenkins and now we can move to GitHub integration.


Note : The default Jenkins server is NOT encrypted, so the data submitted with this form is not protected. When you're ready to use this installation, follow the guide How to Configure Jenkins with SSL using an Nginx Reverse Proxy This will protect user credentials and information about builds that are transmitted via the Web interface

Step 9: Creating a Jenkins job for GitHub repository
  • To Create a new task for Jenkins, click on “New Item” then enter an item name that is suitable for your project and select Freestyle project. Now click 'Ok'.


  • Select the GitHub project checkbox and set the Project URL to point to your GitHub Repository.


  • Under Source Code Management tab, select Git and then set the Repository URL to point to your GitHub Repository.
  • Now Under Build Triggers tab, select the “Build when a change is pushed to GitHub” checkbox.


  • At the end, execute Shell script as shown below. When the configuration is done, click on save button.

Note: Refspec in Source Code Management has to be added exactly as shown below where you only change the branch accordingly.


+refs/heads/master:refs/remotes/origin/master

Step 10: Configure GitHub for Jenkins

  • Install the Jenkins (GitHub plugin) on a git repository.
  • Now set the Jenkins hook URL as the URL for your machine as shown below.
http://ipaddress_or_domain:7011/github-webhook/

Finally,every time you publish changes to GitHub, it will trigger new Jenkins job. Now you know an entire process of continuous integration with Jenkins and GitHub. 

Is there anything you'd like to clarify about Jenkins and GitHub? Let me know in the comments below!

Sunday, 18 March 2018

Develop a simple Angular 4 application with Angular cli in Visual Studio Code for beginners


What is Angular-cli?

Angular cli is command line interface to scaffold and build angular apps using nodejs style modules.
It provides you scalable project structure, instead it handles all common tedious tasks for you out of the box.

Let's see how to create angular apps using angular cli with an example. First setup your development by following below steps.

1) Download and install Node.
2)Install angular cli by following the command below.
  • npm install -g @angular/cli
Now we have setup the angular cli and ready to create the angular application. Let's see how to
create angular apps using angular cli.

1) From the terminal, run the following command to create the application.
  • ng new TestApp
  • cd TestApp
Note - It will take little time to setup the angular application.

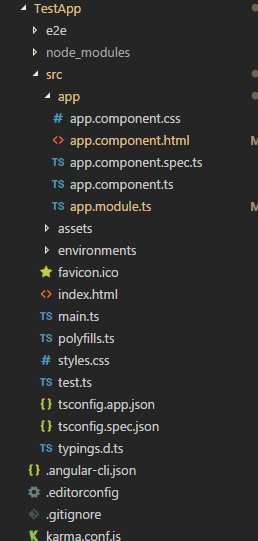
Structure of the created application
2) Now create a folder inside app folder and name it home.
3) Navigate to home folder and create 4 files with the following names.
  • home.component.ts
  • home.service.ts
  • home.component.css
  • home.component.html
4) Inside the home.service.ts add the following code where I implemented a method to call the get all products method of product api.

import {Injectable} from "@angular/core";
import {Http,Request,Response,Headers, RequestOptions} from "@angular/http";
import { HttpClient, HttpHeaders } from '@angular/common/http';
import { Observable } from 'rxjs';
import 'rxjs/add/operator/map';

@Injectable()

export class HomeService{
http:Http;
constructor(http:Http){
this.http=http;
}

private getAll():Observable<Response>{
debugger;
let headers = new Headers({ 'Content-Type': 'application/json' });
let options = new RequestOptions({ headers: headers });
let getAllCourses=this.http.get('http://localhost:5000/api/product/',options);
return getAllCourses;
}

getProducts():Observable<Response>{
return this.getAll();
}
}


5) Inside the home.component.ts, add the following code to call the home.service.ts and pass it home.component.html.

import { Component, OnInit,Input } from '@angular/core';
// import { Http, Response } from '@angular/http';
import {HomeService} from "./home.service";
import 'rxjs/add/operator/map';
import {Router, ActivatedRoute} from "@angular/router";
import { Observable } from 'rxjs';


@Component({
selector: 'app-home',
templateUrl: './home.component.html',
styleUrls:['./home.component.css']
})

export class HomeComponent implements OnInit{
products;
constructor(private home:HomeService,router:Router){

}

ngOnInit() {
this.home.getProducts().subscribe(prod=>{
debugger;
this.products=prod.json();
})
}

}

6) Now add the following code to home.component.html to list the products.
<div class="row">
<div class="imaged-block">
<div style="width:50%;float:left;margin-top:10px">
<div>Name</div>
</div>
<div style="width:50%;float:right;margin-top:10px" >
<div>Unit Price</div>
</div>
</div>
<div class="col-lg-4 col-md-4 col-sm-4 col-12" *ngFor="let prod of products">
<div class="form-control" (click)="openCourse(course.guCourseId)">
<div class="field-group-heading" style="width:50%;float:left">
<div>{{prod.name}}</div>
</div>
<div class="field-group-heading" style="width:50%;float:right" >
<div>{{prod.unitPrice}}</div>
</div>
</div>
</div>
</div>

7) There are few more steps to do to run the application successfully. Follow the below steps.
    In order to use Http provider ,RouterModule, home service and home component we need to 
    add it to app.module.ts.  Let's add the following code to app.module.ts

import { RouterModule } from '@angular/router';
import { HomeComponent } from './home/home.component';
import { BrowserModule } from '@angular/platform-browser';
import { NgModule } from '@angular/core';
import {HomeService} from './home/home.service';
import { AppComponent } from './app.component';
import { HttpModule } from '@angular/http';
@NgModule({
declarations: [
AppComponent,
HomeComponent
],
imports: [
BrowserModule,
HttpModule,
RouterModule.forRoot([
{
path: '',
component: HomeComponent
},{
path: 'home',
component: HomeComponent
}])
],
providers: [HomeService],
bootstrap: [AppComponent]
})
export class AppModule { }

8) Finally, add the following code to app.component.html to inject router-outlet as shown below.

<div class="container">
<router-outlet></router-outlet>
</div>

Now we have come to the end where now we can run the application and see the output.

Wednesday, 17 January 2018

ASP.NET Core 2 Web API and Entity Framework Core 2 using Visual Studio Code for beginners


What is ASP.NET Core?

ASP.NET Core is a cross platform,high performance,open source framework for building modern,cloud based, Internet connected applications. With ASP.NET Core, you can:

  • Build web apps and services, IoT apps, and mobile backends.
  • Use your favorite development tools on Windows, macOS, and Linux.
  • Deploy to the cloud or on-premises.
  • Run on .NET Core or .NET Framework.


Let's see how to integrate ASP.NET Core 2 and Entity Framework Core 2 with an example. First set up your development by following the below steps.

1) Download and install

  • .NET Core 2.00 SDK
  • Visual Studio Code C# extension
2) Restart your PC/Device to apply the changes.

3) From the command prompt (cmd) run the following commands to create the project
  • mkdir Product
  • cd Product
  • dotnet new ProductApi
4) Open the ProductApi folder in Visual Studio Code and select the Startup.cs file.
  • Select Yes to the Warn message "Required assets to build and debug are missing from 'ProductApi'. Add them?"
  • Select Restore to the Info message "There are unresolved dependencies".
5) Create new controller and name it as 'ProductController'


Add new class


Add Controller
6) From the command prompt (cmd) run the below commands to create a class library for data access logic and database context.

  • cd ..
  • dotnet new classlib -n Product.Service -o Product.Service
  • cd Product.Service
  • mkdir Data
  • mkdir Logic
  • mkdir Models
7) Open the Product.Service.csproj file and add the following references.

Sample csproj file
8) From the command prompt,navigate to Models folder and create a class called Products and define properties as shown below.

public class Products
{ public int Id { get; set; } public string GuProductId { get; set; } public string Code { get; set; } public string Name { get; set; } public double UnitPrice { get; set; } public string PaymentOption { get; set; } public string Description { get; set; } }


9) From the command prompt, navigate to Data folder and create a class called ProductContext and inherit DbContext class of Microsoft.EntityFrameworkCore namespace as shown below.


using Microsoft.EntityFrameworkCore; 
using Product.Service.Models;

public class ProductContext : DbContext {      public ProductContext(DbContextOptions<ProductContext> options): base(options)      {      } public DbSet<Products> Products { get; set; } }


We have successfully created the DbContext and Model classes to interact with the database. Now We are going to implement the Repository pattern in DAL Project to interact with the database and communicate with the API project .
10) From the command prompt,navigate to the Logic folder in DAL Project and run the following commands.

  • cd ..
  • cd Logic
  • mkdir Repository
  • cd Repository

11) Create an interface called IProductLogicAPI to define methods and then create a class called ProductLogicAPI and inherit the interface created before to implement the methods as shown below.

using System.Collections.Generic; using System.Threading.Tasks; using Product.Service.Models;
public interface IProductLogicAPI { Task<IEnumerable<Products>> GetAll(); Task AddProducts(Products product); Task<Products> FindProduct(string key); }

using System.Collections.Generic; using System.Threading.Tasks; using Product.Service.Data; using Product.Service.Logic.Repository; using Product.Service.Models; using System.Linq; using Microsoft.EntityFrameworkCore;

public class ProductLogicAPI : IProductLogicAPI { ProductContext _context; public ProductLogicAPI(ProductContext context) { _context = context; } public async Task<IEnumerable<Products>> GetAll()
{ return await _context.Products.ToListAsync(); } public async Task AddProducts(Products product) { await _context.Products.AddAsync(product); await _context.SaveChangesAsync(); } public async Task<Products> FindProduct>(string key) { return await _context.Products .Where(e => e.GuProductId.Equals(key)) .SingleOrDefaultAsync(); } }


12) Open the ProductApi.csproj file and add the following reference to it.

<ItemGroup> <PackageReference Include="Microsoft.AspNetCore.All" Version="2.0.5" /> <PackageReference Include="Microsoft.EntityFrameworkCore.SqlServer" Version="2.0.1" /> <PackageReference Include="Microsoft.EntityFrameworkCore.Tools" Version="2.0.1" /> <PackageReference Include="Microsoft.EntityFrameworkCore.Design" Version="2.0.1" /> </ItemGroup> <ItemGroup> <DotNetCliToolReference Include="Microsoft.VisualStudio.Web.CodeGeneration.Tools" Version="2.0.2" /> <DotNetCliToolReference Include="Microsoft.En
tityFrameworkCore.Tools.DotNet"
Version="2.0.0"/> </ItemGroup> <ItemGroup> <ProjectReference Include="..\Product.Service\Product.Service.csproj" /> </ItemGroup>


13) Open the ProductController and add the code shown below.

[Route("api/[Controller]")]
public class ProductController : Controller { public IProductLogicAPI ProductRepo { get; set; } public ProductController(IProductLogicAPI _repo) { ProductRepo = _repo; } // GET api/values [HttpGet] public async Task<IActionResult> GetAll() { var productList=await ProductRepo.GetAll(); return Ok(productList); } [HttpGet("{id}", Name = "GetProduct")] public async Task<IActionResult> GetById(string id) { var item = await ProductRepo.FindProduct(id); if (item == null) { return NotFound(); } return Ok(item); } [HttpPost] public async Task<IActionResult> AddProduct([FromBody] Products product) { if (product == null) { return BadRequest(); } await ProductRepo.AddProducts(product);
return CreatedAtRoute("GetProduct", new { Controller = "Product",
id = product.GuProductId }, product); } }

14) Open the startup.cs file and add the following commands.

services.AddDbContext<ProductContext>(options => options.UseSqlServer(Configuration.GetConnectionString("DefaultConnection"))); //using Dependency Injection services.AddScoped<IProductLogicAPI, ProductLogicAPI>();

15) Open the appsettings.json and add the connection string as shown below.

{
"Logging": { "IncludeScopes": false, "Debug": { "LogLevel": { "Default": "Warning" } }, "Console": { "LogLevel": { "Default": "Warning" } } }, "ConnectionStrings": { "DefaultConnection": "Data Source=SERVER-LAP;Initial Catalog=NComDB;
Integrated Security=True;MultipleActiveResultSets=True" } }

16) From the command prompt, navigate to Product.Service (DAL) project and then run the following commands to migrate model to database.

dotnet ef --startup-project ../ProductApi migrations add init

Note - add init migrations command will create c# class for model snapshot.

After this run the following command to create the database in SQL Server.

dotnet ef --startup-project ../ProductApi database update


Now we have come to the end where now we can run the project and insert data to SQL Server database using Entity Framework. I hope this article is helpful for beginners.


Integrating SonarQube with Jenkins for PHP

SonarQube  is a quality management tool popularly used among 85000 companies around the world. It has four editions. Community Edition ( ...