What is Angular-cli?
Angular cli is command line interface to scaffold and build angular apps using nodejs style modules.
It provides you scalable project structure, instead it handles all common tedious tasks for you out of the box.
Let's see how to create angular apps using angular cli with an example. First setup your development by following below steps.
1) Download and install Node.
2)Install angular cli by following the command below.
- npm install -g @angular/cli
Now we have setup the angular cli and ready to create the angular application. Let's see how to
create angular apps using angular cli.
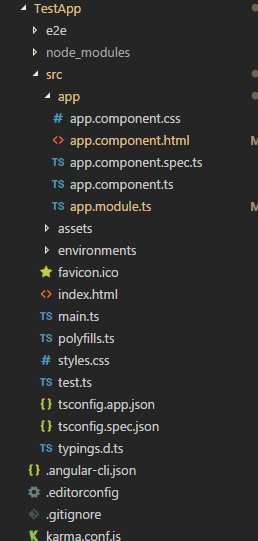
1) From the terminal, run the following command to create the application.
- ng new TestApp
- cd TestApp
Note - It will take little time to setup the angular application.
 |
| Structure of the created application |
2) Now create a folder inside app folder and name it home.
3) Navigate to home folder and create 4 files with the following names.
- home.component.ts
- home.service.ts
- home.component.css
- home.component.html
4) Inside the home.service.ts add the following code where I implemented a method to call the get all products method of product api.
import {Injectable} from "@angular/core";
import {Http,Request,Response,Headers, RequestOptions} from "@angular/http";
import { HttpClient, HttpHeaders } from '@angular/common/http';
import { Observable } from 'rxjs';
import 'rxjs/add/operator/map';
@Injectable()
export class HomeService{
http:Http;
constructor(http:Http){
this.http=http;
}
private getAll():Observable<Response>{
debugger;
let headers = new Headers({ 'Content-Type': 'application/json' });
let options = new RequestOptions({ headers: headers });
let getAllCourses=this.http.get('http://localhost:5000/api/product/',options);
return getAllCourses;
}
getProducts():Observable<Response>{
return this.getAll();
}
}
5) Inside the home.component.ts, add the following code to call the home.service.ts and pass it home.component.html.
import { Component, OnInit,Input } from '@angular/core';
// import { Http, Response } from '@angular/http';
import {HomeService} from "./home.service";
import 'rxjs/add/operator/map';
import {Router, ActivatedRoute} from "@angular/router";
import { Observable } from 'rxjs';
@Component({
selector: 'app-home',
templateUrl: './home.component.html',
styleUrls:['./home.component.css']
})
export class HomeComponent implements OnInit{
products;
constructor(private home:HomeService,router:Router){
}
ngOnInit() {
this.home.getProducts().subscribe(prod=>{
debugger;
this.products=prod.json();
})
}
}
6) Now add the following code to home.component.html to list the products.
<div class="row">
<div class="imaged-block">
<div style="width:50%;float:left;margin-top:10px">
<div>Name</div>
</div>
<div style="width:50%;float:right;margin-top:10px" >
<div>Unit Price</div>
</div>
</div>
<div class="col-lg-4 col-md-4 col-sm-4 col-12" *ngFor="let prod of products">
<div class="form-control" (click)="openCourse(course.guCourseId)">
<div class="field-group-heading" style="width:50%;float:left">
<div>{{prod.name}}</div>
</div>
<div class="field-group-heading" style="width:50%;float:right" >
<div>{{prod.unitPrice}}</div>
</div>
</div>
</div>
</div>
7) There are few more steps to do to run the application successfully. Follow the below steps.
In order to use Http provider ,RouterModule, home service and home component we need to
add it to app.module.ts. Let's add the following code to app.module.ts
import { RouterModule } from '@angular/router';
import { HomeComponent } from './home/home.component';
import { BrowserModule } from '@angular/platform-browser';
import { NgModule } from '@angular/core';
import {HomeService} from './home/home.service';
import { AppComponent } from './app.component';
import { HttpModule } from '@angular/http';
@NgModule({
declarations: [
AppComponent,
HomeComponent
],
imports: [
BrowserModule,
HttpModule,
RouterModule.forRoot([
{
path: '',
component: HomeComponent
},{
path: 'home',
component: HomeComponent
}])
],
providers: [HomeService],
bootstrap: [AppComponent]
})
export class AppModule { }
8) Finally, add the following code to app.component.html to inject router-outlet as shown below.
<div class="container">
<router-outlet></router-outlet>
</div>
Now we have come to the end where now we can run the application and see the output.


No comments:
Post a Comment